Sabtu, 11 September 2010

Y-back vs X-back Styles

One of the special things about wearing braces is the different styles they come in. Brace straps are generally worn straight down in the front, and cross over (X-back) or join (Y-back) in the back. However, there are other varieties, including crossing over in the front (X-front) and not crossing over at all (parallel). Before taking about X-back and Y-back, lets take a moment to discuss these other varieties and why they are generally not recommended.

X-front, as shown on the right, crosses over in the front. This may look fashionable, but is actually distracting with the large X in the front. It also crosses in the wrong place. For ladies, this is probably uncomfortable.


Parallel brace straps run over the shoulders and attach to the same side on both the front and back. They are not connected together. As a result, when they don’t have sufficient tension in the straps they will easily slip from the shoulders, as nothing is holding them together. This style was the original style of braces, and people found them to be very uncomfortable as they always slipped off. As such, they joined the straps in the back (H-back), or crossed them over (X-back).


The next style is the H-back, which connects the two brace straps in the back. These braces effectively support the pants and do not slip off the shoulders. In fact, ledehosen are designed around the H-back style. Wear H-back braces if you can find them, as they are very rare. By rare, I mean those with buttons and excluding ledehosen.

Now onto the more common styles: Y-back and X-back. Y-back have shoulder straps that combine at the mid-point of the back and then go into a single strap to attach to the pants.  
Y-back braces
One variation on the Y-back is worn by military people - V-back braces shown below. This is to accommodate any height of the wearer. They can tend to slip off the shoulders easier as the junction is lower down the back.
V-back braces

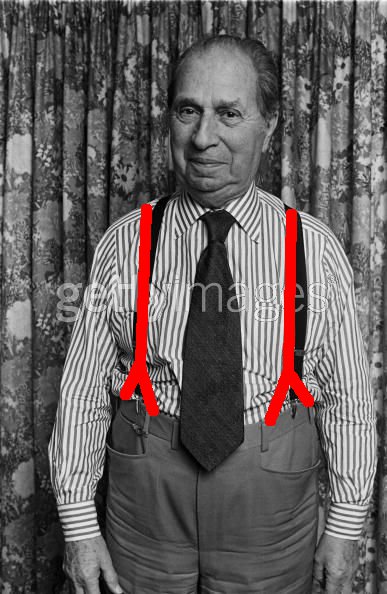
X-back go down the back and cross-over to the other side. This allows wider range to actually hold up the pants. As such, it is recommended for people with larger pants. For illustration, as this gentleman is more portly, he should not use Y-back braces as shown...
Y-back braces with large pants
Rather, the gentlemen should use X-back braces like these, which provide better support of the pants.
X-back braces with large pants

Notice the total of 4
brace buttons on the back
Fish-tail back
Some people suggest that Y-back are more stylish than X-back. I couldn’t say, but from a functional perspective, there are advantages for each. Y-back attaches to the middle of the pants, and can provide the random wedgie. Even when button-on Y-back braces are used, the space between the buttons is generally less than 4 inches, and can cause the pants to ride up. This look is desired when wearing a fish-tail back such as those illustrated to the left.

The junction on X-back braces cross higher on the back and thus can be spaced wider apart when they reach the pants. This allows them to anchor approximately one-third the distance on the back of the pants and provide better support. Thus, when you need to hold up the pants, X-back is preferred. In fact, you can add two more connection points to X back to have a total of 4, and ensure your pants are secure. Notice how level the pants are to the right.

X-back braces may also have the added benefit of positioning the junction at the correct height, relative to the wearer. This is important for people with sloped shoulders. When the junction is lower on the back, the shoulder straps will have a tendency to slip down the sloped shoulders and even slip off. This is annoying and doesn’t serve the braces purpose. To solve this problem, the junction should be raised higher on the back, closer to the neck, while still being comfortable. X-back braces generally have a movable junction to facilitate this. 

The junction on these braces is too low and will likely slip off the shoulders. As the junction is movable, it should be raised. 
The junction on these braces is not movable, but is at the correct height. Notice also the fish-tail back:


If the back junction cannot move, you can effectively raise the junction by adding tabs at the rear of the pants:
Pants with tabs to raise the junction
Placement of braces without tabs

X-back braces can also use a D-ring, illustrated below. These are common among Albert Thurston braces and very comfortable.
D-ring rear junction braces by Albert Thurston


Swivel Back Braces
One variety of X-back braces that is very comfortable is the swivel-back braces, as illustrated to the left. These are also known as Paris Free-Swing braces. These have a joint loop that swivels with the bodies movement. I have tried these out and can verify that they are very comfortable and keep the suspender straps in place on the shoulders – no slipping!


Here's the complete look, complements of this link - very stylish.

There's also ads for President Suspenders. I have yet to see these in use. They look comfortable and very flexible, with all the pulleys and strings, but that could also be annoying.

You may think that we have exhausted all the possible styles for braces. On the contrary, there have been at least 12 different versions over the history of braces, as shown here:

And a page from the "Suspender Department" from an old catalog.


Discussion time:
  • What do you think of the different styles?
  • Do you find the Y-back or X-back style more comfortable?

Note: all photos are used solely for non-commercial use and to illustrate braces in fashion. No plagiarism is intended.

Rabu, 08 September 2010

Placement of Brace Buttons

Buttons should be aligned with the pleats,
marked by the red dots
Now that we've covered off that braces should be worn with buttons (see previous post), where should the buttons be placed?

Placement of buttons is critically important to wearing braces. It determines where the brace straps lie and the line of the pants. In fact, you can probably notice a man wearing braces with a suit even when he has his jacket on, by the way the pant line cuts down the middle (when worn with pleated pants).  Buttons that are too close to the mid-section are uncomfortable and get in the way; too far apart, and the buttons do not adequately support the pleat and pant lines. This is true for both the front and back of the pants.

Alan Fusser correctly notes that there should be four buttons in the front: one over each of the main pleats, the other two just forward of the side seam. Depending on the brace connection, I find that 3.5-4 inches from pleat to side seam is comfortable and provides superior support. In the back, there should be two buttons (for Y-back and X-back style), equidistant from the center of the fork of the braces, so it falls naturally. Here it depends on the style of braces you plan to wear – Y-back braces require buttons closer together (about 2 inches on each side of the middle seam) while buttons for X-back braces should be spaced a little farther apart. I’ve found that 3-4 inches on each side of middle seam is comfortable. There is also a variety that has 4 buttons in the back for X-back braces:


Button placement and clip placement on the front
The placement of the buttons in the front of the pants is critical to supporting the line of the pants. To illustrate Alan Fusser's advice above, here are 2 pictures:
The one on the left has the buttons too close to the center and does pulls from the middle. The one on the right has the buttons placed too far to the side, supporting the side seam, but the main seam will sag. Therefore, there is a balance that should be achieved. The main seam is most visible and should be supported first, followed by the side seam. Depending on the size of the pants and size of the leather brace loop, you may be able to support both the main and side seam with the braces, such as in this photo:
What if you are wearing clip-on suspenders - where do you place the clip? This is precisely the problem with clip-on suspenders - they do not adequately support the pants. You must compromise and place the clips either on the main seam or the the middle between the main seam and side seam. Try a number of locations and see what feels most comfortable for you.

Button placement and clip placement on the back
Just as the placement of the buttons on the front is important, it is even more important on the back. This is generally the place where newbie suspender-wearers get confused, as they will likely be wearing X-back style, and attach the clips either too close together or too far apart on the waistline:
1. If the buttons are too close together, you can get a wedgie.
2. If the buttons are too far along the pant waist, the pants will not be supported properly and will be uncomfortable when rotating.

Also, if the clips are too far apart, you may cause the waistline to bulge outward, ruining the flat line.

Therefore, it is critical that you determine the right balance for the rear buttons along the waistline. They should be equidistant from the center of the rear seam, but not too far that they create a bulge out. This exact distance depends on the size of the individual, the position of the back junction, and length of the back straps, so this will vary by suspenders and braces. Here is an example of appropriate distance of the straps at the rear:


Buttons inside or outside?
The buttons may be sewn inside or outside the waistband, depending upon personal preference. Historically, when vests were worn and concealed the braces, the buttons were sewn on the outside. When people started shedding vests, the buttons migrated to the inside. I personally don’t notice a difference when wearing braces on the outside or inside, but you may. As for fashion, I think it can be very stylish to display the brace buttons on the outside of your pants or skirt. However, it can be distracting if the pants also have belt loops.

Wearing belts and braces at the same time - biggest newbie blunder
Pants / skirts to be worn with braces should not be worn in with a belt. You don’t need both a belt and braces to perform the same function of holding up your pants / skirt. There is redundancy here, in addition to looking bad. Therefore, the wearer must decide how to wear the pants – with braces or with a belt.


Belt Loops
Therefore, pants to be worn with braces should not accommodate a belt and so should have no belt loops (or be removed). Pants to be worn with braces should be a little larger at the waist so that they are actually "suspended" from the shoulders. 


The skirt on the right is too large
around the waist; on the left is
perfect size.

The front side of the skirt from the left picture displays
the correct waist size, button placement and suspension
(unfortunately the brace material is deteriorating)
I understand that the majority of suit pants and skirts are made ready to wear, and the majority of society does not wear braces. As such, the majority of pants and skirts come with belt loops, and so people leave them on when wearing braces (even with buttons). However, if you are to be functionally correct, the belt loops should be removed. Think of it like wearing a cuff-link shirt with no cuff-links – you know something’s missing. 

Don't follow his example. Not only does he have belt loops, he also has poor button placement - they are not aligned with the pleats and are too close to the center.


Types of buttons
While we are discussing button placement, we should also discuss buttons for braces. Brace buttons should:
  • have 4 holes (rather than 2) to anchor the button to the pants. This provides proper support.
  • be cone-shaped on the side facing the brace strap. If a straight button is used, the button threads will start to dig into the leather brace strap when tension is applied and cut it from the button hole on the brace strap. Eventually, or with enough force, the button hole will break open and the braces will lose tension. The button may still be attached, but the brace strap is unusable as the button hole is ripped open. To avoid this situation, cone-shaped buttons should be used. 
  • match the inside lining of the pants if they are on the inside. If the buttons are on the outside, feel free to sew on decorative buttons or ones that match the pattern.

A word on buttons popping off
One of the chief advantages put forth by the proponents of clip-on suspenders is that there is no buttons popping off – once a clip snaps off you can easily reattach it. While this is true, it misses the point of using buttons for braces and the style benefits of buttons. 

Significant stress is usually needed to
pop-off buttons
Balance is needed when determining the strength of the button threads to anchor braces – too strong and the brace strap will break from pressure resulting in the braces not being usable, too weak and the button threads will be constantly failing and buttons popping-off, resulting in the need to sew on the buttons. Contrary to belief, buttons popping off is not poor design. In fact, braces are attached with buttons to allow them to pop off under significant stress to save the brace loop button holes and ultimately the braces. I would rather have a popped button than a broken button hole on the brace loop, resulting in the braces being unusable. Therefore, use the right thread weight and strength when sewing on the buttons. I’ve generally found that about 3 threads through each button hole is sufficient.


The brace buttons that generally pop off are the back ones. This is because they experience the most strain in tension. Consider this turn of events from a Stan Laurel movie in 1924:

The man has lost both his back suspender buttons and is unable to use his braces to hold up his pants. However, the brace loop button holes are intact, so all he needs is new buttons to be sewn on to use his braces again. Also notice the durability of the left button - only popping off after significant pressure. So unless someone has the braces in their firm grip and pulling them, they generally do not pop-off. Clip-on suspenders snap off and would need to be constantly attached, which is annoying - your pants are not held up when your suspender clips keep snapping off! The fact is, clip-on suspenders would have snapped off a lot sooner than the buttons popped off. Therefore, use buttons whenever possible.

Here's a cute poem:


Roll-over
When sewing on buttons on the inside, the braces will pull-up the pants (doing their assigned task), and you may get the dreaded roll-over
To avoid this, make sure the button threads are sewn almost completely through the pants and get the majority of the pant lining. It may also help to put the button on the upper portion of the pant lining. You may also consider sewing completely through the pants using the same color thread as the pant material. Or, simply sew the buttons on the outside...

Gary Cooper displays excellent button placement and style.
If there is one area that separates newbie brace wearers from seasoned veterans, it is in button placement. An expert brace wearer can tell the moment they see someone wearing braces if they are worn correct or not. So take note of these important details for  the next time you sew on buttons or wear braces.

Discussion time:
  • Where do you find button placement to be most comfortable?
  • Do you prefer buttons on the inside or outside?
  • Do you find your buttons are popping off?
  • Have any humorous stories of buttons popping off?

Note: all photos are used solely for non-commercial use and to illustrate braces in fashion. No plagiarism is intended.

Sabtu, 04 September 2010

Suspender Connections: Clip-ons versus buttons

Clip-on suspenders
Suspenders can be connected to your pants in two main ways: clip-ons and buttons. There’s also a few more, which I’ll briefly mention, but these are the 2 methods.
Clip-on suspenders have sharp teeth that grip the pant material. They are sometimes called alligator clips. The clip grips the waistband of the pant, leading to the material being damaged over time. Clip-ons provide a quick, easy method to attach suspenders to your pants or skirt. Each shoulder strap has 1 clip that snaps to the front of your pants on each side of the hips, and 1 or 2 clips (depending on if it’s a Y or X style) that clip to the back. They come in wide variety of colors, can be thin or wide, and add a fresh spice to a dull wardrobe. Because they are so easy to attach, they are designated to the novice suspender-wearer.
Wearing clip-ons with a formal suit or skirt not only looks tacky and cheap - like wearing a clip-on tie - but also damages the materials from the pull of the sharp teeth. No well-dressed individual would use clip-ons when wearing a formal outfit.


Button-on braces
The better option is to use buttons to attach the suspender straps to your  pants or skirt. Button connections use leather ends that attach to the strap. Button-on braces are more comfortable, traditional and formal than clip-on suspenders. Where clip-ons have 1 point of contact with the pants, button-ons have 2. There are 2 buttons at each end of the suspender straps - 2 on each side in the front, and 2 buttons in the back for a total of 6 buttons. This results in 6 “connection points” to the pants, compared to a minimum of 3 connections with Y-style clip-on suspenders – double the connections! More connection points means your pants stay in place better and the straps will not move as much. Your pants will still stay up even if you pop a button. There’s also braces that have 8 connection points – 4 in the front, and 4 in the back, which can be very comfortable.


Connection points are the key consideration. If you just want to follow the latest trend, you can use clip-on suspenders. But if you actually want comfort and to hold up your pants, you should use button-on braces. Case in point, this man wearing suspenders when he should be wearing braces. The suspenders are not adequately supporting the pants. He should be wearing button-on braces to properly support his wider waist with 4 connection points in front.
More connection points (with braces) would better support these pants

Brace tabs
Inverse V-tabs
With buttons, there’s a sub-category: inverse V-tabs and inverse U-tabs. V-tabs have 2 separate straps or tabs that connect to the buttons, while U-tabs are a half loop. Both have their advantages and disadvantages.  

V-tabs are more traditional, with a D-shaped ring that allows the straps to pivot over the shoulder strap. When the brace wearer moves, the straps pivot along the ring, but do not shift left or right when you lean left or right. Therefore, when you lean sideways, the opposite side will feel a pull on the outer button, pulling the pants up. This increased strain is the number one reason for buttons popping off, and why the outer button generally pops off first.
Note the popped button and
loose brace strap
The straps are generally made of leather, although could be made of other material.

As a result of the disadvantages of V-tabs, U-tabs were invented.
Inverse U-tabs
U-tabs are somewhat more modern with a strap to allow the shoulder strap to hold the braces in place. This allows the braces to glide left or right to accommodate to the body’s movement. This provides more freedom and superior comfort. In the front, when you lean sideways, the strap slides to that side. This results in less strain on the buttons, especially the outer buttons. When you wear Y-back braces, when you lean left, the back strap will slide left; when you lean right, the back strap will slide right. This also occurs on the front straps. Everything in line, everything comfortable, and less strain on the buttons! This is likely the reason they have become the predominant style for braces (excluding clip-on suspenders).

Here is Robert Shaw playing Doyle Lonnegan in The Sting, 1973. He is wearing inverse-U tab braces. Notice how the inverse-U tabs shift as he bends forward (red outline). There is shorter space in the inner side then the outer side. This would not be the case if he was wearing inverse-V tabs (blue outline). Notice the extra strain that the front-side button has to endure with when inverse-V tab braces are worn, whereas the inverse-U tab style shifts some of the pull.
Doyle Lonnegan from The Sting, 1973


Many opponents to braces state that buttons pop off easily. After wearing braces for many years, I have simply not found this to be the case. In fact, up to this point I think I can only remember one time that 1 button popped off, and that was due poor workmanship. I noticed it in time and retrieved the button. The braces continued to hold up my pants, and I continued on my way.

If you are concerned about buttons popping off, I recommend wearing inverted V-tab braces. One drawback of U-tabs is that if one button pop-off, the strap pulls up as one end of the tab is not anchored anywhere. This is not the case in with inverse V-tabs which retain the tension as the tab is anchored to the pants and to the strap junction. Mind you, if you pop-off a button on either style, the loss in the connection point will be noticed!

As you’ve probably noticed, I generally use suspenders to refer to clip-on suspenders, and braces to refer to the button-on variety.

I recommend button-on braces any and every day over clip-on suspenders. But you do get marks for wearing suspenders!

The primary disadvantage of clip-on suspenders is that they always snap off at the wrong time, or need constant adjusting...

...but they are easy to put on to hold up pants.


Alternative connections include:
- bachelor buttons provide a permanent connection with a metal rivet and suitable for denim. These are useful when doing heavy labour, but may not be stylish.

- single connection strap – These are simple and basic, but do not provide sufficient support for the pants. This is because there are fewer connection points which will result in sagging.

Or this single-button style that uses braces to attach to a single button:

- Clip on, button-style connectionslike these. These are the middle ground connections that try to be too much. They are handy for snapping on your pants, but are not suitable for formal wear, where buttons show the more polished image.


- Straps sewn directly into the pants or skirt. These are stylish, but don’t allow for movement and stretch during the day. As a result, they are more prone to ripping and tearing which is harder to repair than sewing on a button.

Discussion time:
  • What type of connection do you prefer?
  • Do you buy pants/skirts and then find braces to wear with them, or buy braces and then find pants/skirt to wear with it?

Note: all photos are used solely for non-commercial use and to illustrate braces in fashion. No plagiarism is intended.